There are two methods to add, update or delete checklist template
Using template in setting
Using excel
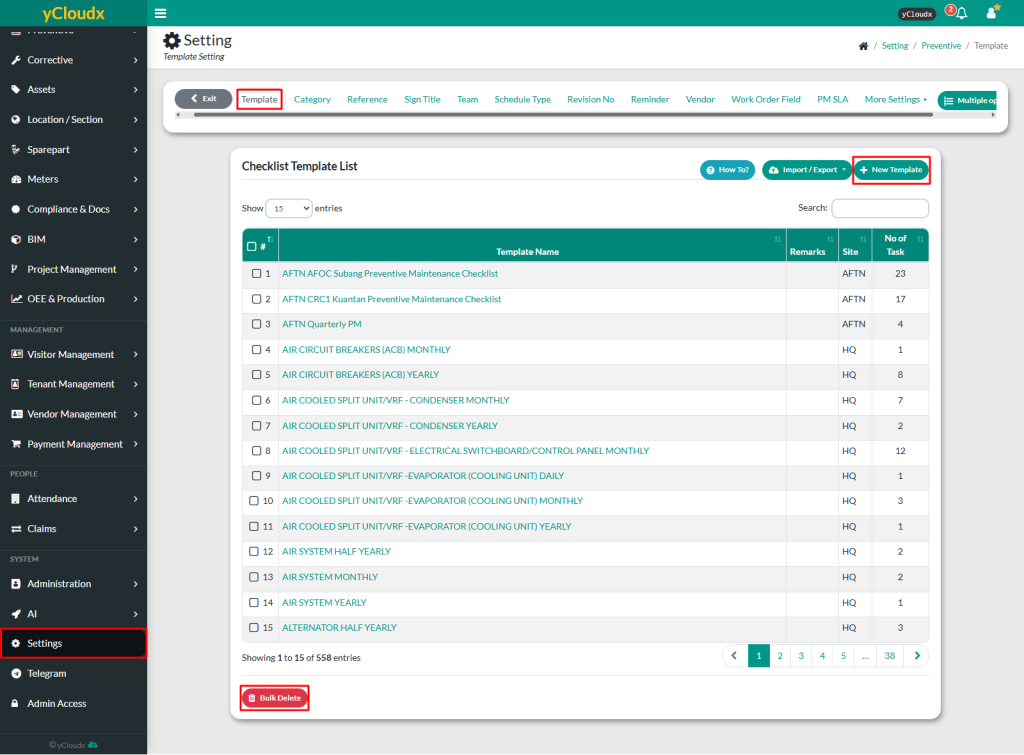
Method 1: Using template in setting
To add new template
Proceed to Setting > Preventive > Template
Insert new checklist template details and provide remarks if needed
Click Add, and the new checklist template will be added to the list
To update or delete template
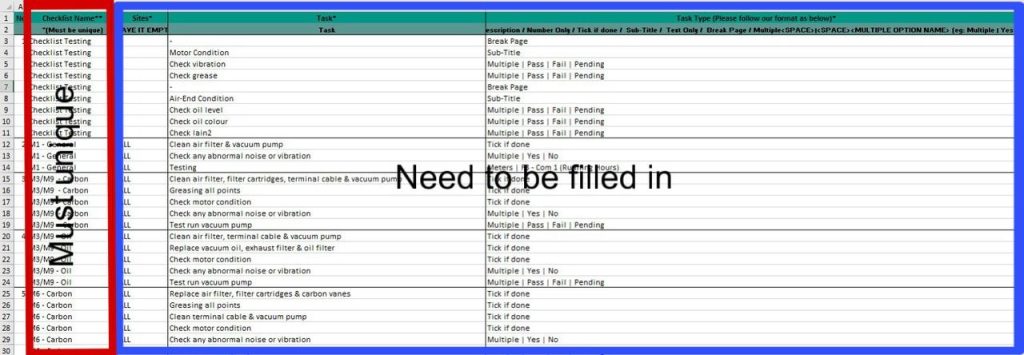
Method 2: Using excel
User able to update checklist template by Import / Export Checklist Template in Excel format
Proceed to Setting > Preventive > Template
Click Import / Export button
Once exported, the file will be in Excel format
User need to insert the checklist template details following the format in the exported file
Do not delete or remove any columns. Leave it blank if there is not information for the column
Text fields marked with (**) must be unique for each checklist and must be filled in such as Checklist Name
Text fields marked with (*) are mandatory, such as Sites, Tasks and Task Type. Other fields are optional but it is recommended to fill in all details
Each task must be placed in a separate row which means if a checklist has ten different tasks, they must be entered in ten separate rows but with the same Checklist Name and Site
User need to insert the correct Task Type from the following option
Break Page – Task appears in a separate box but on the same page
Sub-Title – A subheading for categorizing tasks
Description – Allows text, numbers and symbols
Number Only – Requires numeric input
Tick If Done – A checkbox for marking task completion
Text Only – Displays text without requiring input
Multiple Option – A dropdown menu for selecting option
Save the document and import the checklist template into the system
Proceed to Setting > Preventive > Template > Import / Export > Update Checklist @ Update All Checklist including Upcoming Schedule
Update Checklist – Only updates the checklist
Update All Checklist including Upcoming Schedule – Update checklist including upcoming schedules that have not yet been generated
Note: Any checklist that has already been generated will not be affected or changed, even if the checklist has been updated